Thursday, June 7, 2012

Underground Survival Base

Etho and Extreme Hills biomes. Two things I really enjoy about Minecraft.


Honestly, can you not like majestic terrain like this? It's become the new home for me in my Survival map. My home base has long served me and will continue to do so if I ever return to it. But it's time for a new adventure, and this time I'm going underground. This scenic view is what lies about 50 or more meters above my head.

Since I enjoy Etho and the hills, I figured I would combine them both into my game play! I left everything I owned back at my base and moved to the edge of my map. Using Minutor I located a spot where there were plenty of intersecting caves, to provide a place to live and build. I intend to build with the cave system's shape. Right now I'm sticking to Peaceful, although I want to move to higher difficulties as I become acclimated to the setting.

Before I even made it underground, it was quite the adventure. Food was scarce (as always). I chopped down a tree and chased after some sheep. When I got back to the starting point (on a high spot), I noticed this triple rarity!


That fed me for the first while. There was an entrance that led to a ravine. It was full of Creepers - go figure. I get the feeling these are going to be a long-lasting enemy of mine in this new adventure. This pair watched me as I tried to block them off and kill them.


Funny story. Eventually they lost interest and walked away. Then I fell off of the cobble staircase I was making and I pillared up as fast as I could. In the mean time, they both suddenly came rushing toward me. Peaceful mode for the win!

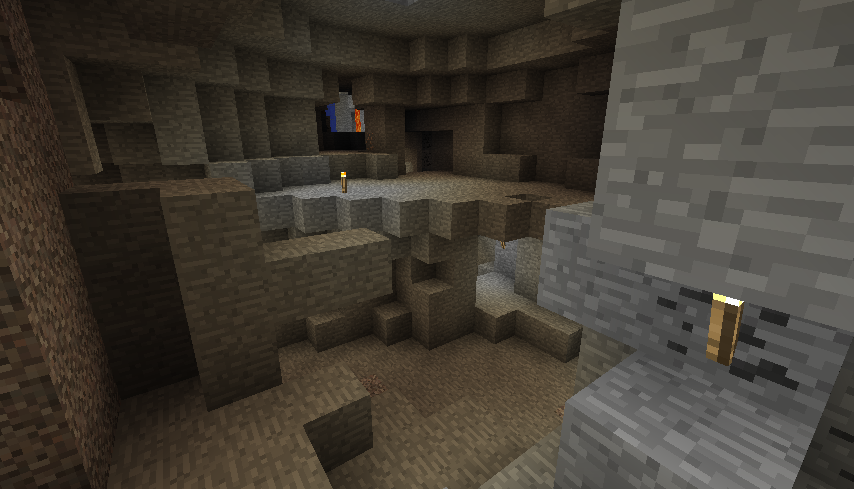
You've seen the screenshot for the new base. I got to work making the basics to survive.


Tons of iron and coal were present, of course. What surprises me is the amount of gold that I found. Has there been an increase in how common it is? I don't remember it being so easy to get.


From here I got working on the central hub. Emulating our favorite Canadian LP'er, it's going to have a grass floor. I added planks around the circumference for good looks. In addition, there's a path underneath it leading to another potential hub. Just recently I discovered there are three paths going to the same place! One is very convenient and will become my main method of reaching it. But I wanted to make this path neat looking so added a flight of stairs.


And the still unexpanded second hub:


There's definitely still a lot to do. I need to run some grass down here, for sure. I also need to move that little thing of wheat out of the way and establish a proper wheat farm. So much to do, I'm dizzy with anticipation!

Wednesday, June 6, 2012

Survival: A New Home


You see a random cave here. I see the future central hub of my new underground Survival mode base. The chamber is roughly spherical and the bottom is around level 20. I can already tell that this hub will have a lower level, an upper level balcony, and a central pillar. Etho, eat your Canadian heart out.

Stay tuned for more.

Monday, June 4, 2012

Ranch Completed [Ultimate City Post 10]

And the ranch is done! Outside and inside views:


As you can see, I have sort of fixed the lighting issue. The planks and bricks go fairly well with the glowstone.


On the west and east walls of the ranch building are the automated wheat stations. Since straining over it with the wheat farm, I've come to memorize just a little bit of the design. I also attempted to make the border of the station look good. The sign says "Wheat Station 1" and Wheat Station 2 is directly opposite of it.


I think in a future round of development, when the city's redstone network is set up, there could be another switch which goes down a wire to the control center that turns on a redstone torch saying that it's out of bonemeal or seeds.

Here's a look at the outside section of the stations:


I like how the top and bottom of the station are essentially reverse in design of the rest of the building. Adds variety. In the second picture, the bottom three layers are probably going to be underground. That one plank block which isn't aligned looks weird. If it's a bother, I can move that to line up with the others.

There's no chests in this building. I thought I might add a fancy piston door closet thing, but that was proving too complex and I wanted to get this done. Ah well, there's always next round.

And in case you are wondering, I'm thinking that there are going to be three rounds to creating the city.

  • First round is what's going on now. Creating the buildings and attempting a good design. According to feedback, the design could be better. :D
  • Second round is bringing together the redstone network. The entire city will be connected through a redstone network which is centralized at the Control Center. Because I haven't figured out all the network components, the Control Center hasn't been designed. This is also the round for the underground water system.
  • Third round is probably what everybody wants: the new design phase. Making the stuff look good.

So what's next? Perhaps the automatic breeder. I will have to check this out on YouTube since I've never done anything like it to any extent.

Thursday, May 24, 2012

Traditional Ranch [Ultimate City Post 9]

And after a little delay, we are back! Today's work was still somewhat lethargic, but progress has been made. For the first 8 posts we were primarily dealing with the farm district of the Ultimate City. With the high levels of automation, it's probably no surprise most of the stuff there looked pretty much the same. It appears that a lot of the plant mechanics are similar.

Today, work began on the ranch district. I don't believe I can get quite as much automation in this district since we are dealing with mobs. Like the tree farm, it will require plenty of manual involvement. I also wanted to go ahead and start a new theme with this district. I was concerned that if I used flammable materials to build with, the city would be susceptible to large fires. Then I realized that the residential districts are going to be full of wooden structures.

The ranch building is modeled similar to the tree farm: four main squares with three-block-wide paths.


Each field is 15x15 and holds a specific mob. For now they will be as follow: back left, Mooshroom; back right, chicken; front left, cow; front right, pig.

I populated the fields using the eggs available via Creative mode and got to work with the paths. I decided to outline each field with planks. I was a little uncertain with the paths. At first I tried sandstone, but wasn't content with how it looked (too bright). I swapped for stone, but the contrast wasn't very good looking. I wanted something a bit less contrasting. However, I came to an odd decision.


That's right. Nether brick. It's a little surprising I didn't discover this from watching so much of Etho's videos. But Nether brick and wooden planks make for a beautiful combination. The contrast is quite pleasant, and their textures complement each other well. I am definitely making this one of my preferred pairings for designs. Next I got working on the walls. I don't need this to be a very tall building. Five blocks tall should suffice. The frame you see is made of pine logs (apparently the official name for these is spruce, although I've often referred to them as pine or redwood). Their sides are similarly colored to the Nether brick, while their tops are nice with the planks.


Next I played with using more Nether brick. I had the roof in place but later removed it. Didn't want it there just yet. If you can't tell, I have the front wall made of Nether brick. Don't know if I want to keep it that way. I also added some lighting to the pens.


May be hard to see the details. I'm not being a good photographer today. Each pen has a glowstone in the middle, with a torch on each corner. The sign by the fence gate indicate what type of animal belongs in it. The middle intersection also has a glowstone block. I need to figure out the lighting for this building.


And the front door. I'm really liking how this building is turning out.

I won't update the download links just yet. I intend on doing that once every few buildings are completed. It seems kinda unnecessary and indeed unprofessional to make an update when I have half a building done.

Also, I played with MCEdit a couple days ago. My Main 1.0.0 and Freebuild Nonlegit 1.0.0 maps have a lot of unused chunks. These are places I've visited once, but since then I've had no need for them. I went ahead and trimmed those extraneous chunks off. Both maps are significantly smaller in size. What's nice is that with the new Minecraft update introducing a new ore, I can visit these plots of land (which aren't very far away) and get those ores.

Saturday, May 19, 2012

The Castle of Inquiery

While playing around in my Classic non-legit freebuild map (which I really ought to make available via Mediafire), I decided I wanted to try making a warp core for a possible starship build. When that didn't work very well, I noticed it would make for a good corner tower thing for a castle. And thus, the Castle of Inquiery was born. Yes, I realize that "Inquiery" is not correctly spelled. Too bad, I'm keeping it that way! :D


The view when you approach it from the front:


And up close. These double doors are both opened by the same time with that one button. This is the first time I've made the redstone circuitry needed to make this happen. Behind the doors is a 2x2 glowstone door entrance that uses sticky pistons. Again, the first time I've ever made such a thing. 


Here's the piston doors viewed from inside the castle.


The centerpiece of the castle is this impressive 2x2 water fountain. If you look, you'll notice that the water blocks aren't being supported by anything. Because following the laws of physics is too mainstream.


On either side of the fountain are two-man barracks providing the essentials to live in them. No redstone here; you click the doors to open them.


Opposite the entrance are the stairs to get to the upper two floors. I don't use stair blocks because you can't run up those.


And the corner tower things (I don't know what they're called). They have a 3x3 tube of lava inside of them. I like how this in combination with the smoothstone and obsidian gives the castle a somewhat futuristic or maybe steampunk appearance. A couple shots from inside and outside.


That's the Castle of Inquiery. This was a quick post so I couldn't go into much more detail - not that there was much more detail to the castle. I spent no more than two hours working on this.

I would like to extend a big thanks to everyone who has downloaded the Main 1.0.0 and Ultimate City maps. It's only been two days since they were released, and already I've had 18 downloads a piece. I hope you are enjoying them! If you have any suggestions for the maps, please let me know in the comments.

Thursday, May 17, 2012

The 100th Post! [Ultimate City Post 8]

Oh wow, here we are! 100th post! I wanted to try and make it a really special post, however I couldn't think of anything majorly special to do. At least, nothing that my current skills would enable me to do. As you've probably come to realize, I am more function-oriented than design-oriented. Although if you scroll down to the bottom of this post you will notice a couple cool things! But wait, read my progress first!

The Denizian pumpkin and melon farm is completed. All I can say is... wow, this is a monster. I can assure you there will never be a shortage of melon slices.


I've switched to an HD texture pack in these pictures.


The button to harvest:

And the return:
What really impresses me about this farm is how there are almost always melon slices to collect! Those melon blocks grow pretty fast.

I've also completed what seems to have been my bane for this project: the wheat farm. The automated farm part was an obstacle that prevented me from doing very much. Due to a WorldEdit mishap it's a little glitchy but I'll work on fixing that during round 2 of the city.

Overview:

What it looks like indoors (I like the half slabs to the harvesting spot):


If you wish to use the traditional farm, this is where you would go:


There's no wheat currently but if you wanted to harvest, here's the water release, and also the step to replant.


The automatic harvester:


Upper shot. I purposely left that gap at the top of the wooden walls for aesthetic purposes.


Rather cramped entrance to the maintenance room.


Some of the wiring. I believe the word to not describe this would be "clean." Indeed, it's kind of a mess. I rushed a bit with the wheat farm. I had been procrastinating on it for several days and just wanted to move on with it.


And finally the basement, which is accessed by that ladder from several pictures back. First we have the lower section of the automatic wheat farm.


This second piece is something much simpler and I actually understand how it works. It's just a line of wire that leads to the block that pushes up for replanting the seeds. (Incidentally, this will also activate if you step on the rightmost pressure plate although it's not very useful.)


And that's that! Now, time for the interesting stuff.

First, Youssarian's Minecraft Adventures now has a Facebook page! Please come "Like" it if you have a Facebook account!

Second, I'm uploading the maps to Mediafire! They're in .zip format. I don't know if that will make it difficult for Macintosh and Linux users to open them. If need really be I could possibly switch to .rar.

Main 1.0.0: This is my main survival world, where I do things (mostly) legitly. Link: http://www.mediafire.com/?n19uj7qyu3yc75c

Ultimate City: This is in Creative mode. Link: http://www.mediafire.com/?p4xjfutfvvooxh3