Saturday, December 29, 2012

Spawn Village Work

The first building at the spawn village has been constructed! Maybe it's not a complete masterpiece, but it's the start of something new and I'll certainly learn from what I may feel are mistakes along the way.

Before I could make the build, I needed a lot more spruce wood. My supply in the cave was very low, and the underground tree farm was hardly conducive to speedy growth. Thus I loaded up on stone brick, regular wood, and stone. Then I headed to the southeast of the cave, to a decently sized snow biome. The biome generation has changed quite a bit since these lands were first formed. My extreme hills base? Yeah, that's a forest now. A bit of swamp by the snow biome is also covered in snow, meaning it's not registered as swampland anymore. A pic of part of the forest, and the awesome ax that cut through it like butter:


I've long used Optifine and Game Booster to try and increase the otherwise dismal FPS on my laptop. I did some more tweaks with Game Booster, with mixed results. My piston elevator still can't push me, but it is now able to get me up a few levels and my framerate seems to be better, although I can't tell for sure. Well, with me working in the forest while chickens and sheep were nearby caused for a sort of stuttering gameplay. Although the FPS was routinely above 30 FPS per second, there were constant split-second freezes that make for a rather unpleasant experience. I was at least smart enough to bring a bed with me to pass the nights.

Once I got to the plains where the spawn village was placed, my framerate improved dramatically, sticking to around 60 FPS. Now if I could get it to always be around 60 I would be very happy. The start of the building:


Yeah, that didn't really turn out like I planned, but I stuck with it. My inspiration is a member of the Mindcrack server named Mhykol. He's known for being the unknown member of the server, the one everybody forgets. His style seems to primarily involve using stone brick as a main building material and spruce wood to line windows. I thought he was using logs, which is why you see logs here. I made two errors with the front: first, I didn't have the logs completely surround the windows, and second, the windows were both too close to the corners, thus they appear to be cut off from the inside.

I made the sides the same dimensions, making sure not to repeat the errors.


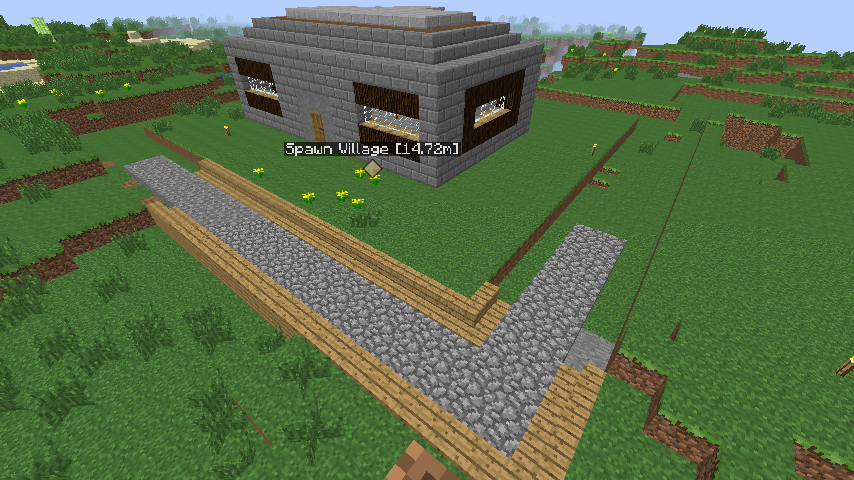
From here, I think things started to improve dramatically. The back of the building is extended slightly, and the roof has three parts: a ring of stone brick stairs, then a ring of spruce half slabs, and finally stone half slabs. The floor is also patterned. With the exception of the front wall, the building is a good start - and an example of how my design skills have improved over the last few months.


Not shown, I threw in a bed, workbench, furnace, and double chest to simplify things. Next I started digging out the spaces where the road system would go. Also inspired by the Mindcrack server, I accidentally reversed how they do it. My road system, apparently, will have oak wood stairs with cobble half slabs.


To the north was a forest I used to get wood for this. Along the way I ran across new terrain. One of the new features:


Yep, a bare-bones, tiny village, the third Testificate village to form on my map! There was at least one villager here. It's nicely located on the outskirts of a snow biome.

I stopped playing Minecraft for the day after I laid down the road. Today I did some portal work. Linking portals is a bit tricky so I watched a YouTube video on it. In my excitement to get going, I sped from the spawn village for a couple hundred meters before remembering what I needed to do!


Alright, so here's a step-by-step guide to connecting portals, which my experiences to illustrate.

1. Pick where in the overworld you want the portal. Press F3 and record the x, y, and z. For x and z, divide the numbers by 8. Then take the result and find what is called its floor. For positive numbers, that's simply the number left of the decimal point. For negative numbers, that's the number left of the decimal point plus one. For me, the numbers came out to x = 9 and z = -2.

2. Go into the Nether and build a portal at the x-y-z coordinate. For me, that was 9, -2 at level 69. I was worried this location would caused problems with the Nether hub's shape. I didn't want to end up parking this portal in a spot that would later be in the middle of the hub. Luckily, the coordinates were literally just outside what I expected to be the hub's walls.

3. I build the portal and lit it up.


4. Then I went back to the overworld, and lit up the portal at my spawn village. I stepped through and arrived at the proper portal in the Nether! Success! Assuming I didn't miss anything, this is now a working portal pair guaranteed to work correctly every time. Which is a whole lot easier than walking and swimming almost 600 meters all the time.

Last order of business for the day was to enchant some iron pickaxes. I'm way too conservative with my diamonds, even though I have plenty of them. I spent some time at my zombie farm and enchanted four iron pickaxes.


The Silk Touch pickaxe won't provide too much of a speed boost, so I may opt to leave that for other things... or just use it anyways.

That's all for now. Things are finally starting to look a little more active on my world. The spawn village and Nether hub both have had some progress.

Thursday, December 27, 2012

Youssarian's Guide to Make Stuff Look Good

Hey there everyone, I wrote this a couple months ago and have been wanting to post it. It's sort of my personal set of rules for designing stuff. I think that as a way of celebrating two years of the blog (a couple days late, oops) I would post this, since after all one of the hallmarks of the past year has been learning how to make stuff look good.

Youssarian's Guide to Making Stuff Look Good

It seems like the main goal of making stuff look good in Minecraft is to avoid straight lines at all costs. Even though rooms may have a rectangular shape, the building as a whole ought not be rectangular, unless it's a minor building. The method I'm developing relies on these sort of rules I've learned. They may differ from what the videos and pictures have taught me, but that's just to have a personalized style.

First, it picking colors. You can choose colors that complement each other, or contrast. Colors that complement each other are similar in color. For example, lapis blocks and purple wool. Similar in color that they could go well together. Also consider emerald blocks and the pukey yellow wool. Birch planks and sandstone seem like they would fall under the category of complements, although I could also see why they might be contrasts. Here are some examples of complementing blocks:


The contrasting colors are ones that seem opposite in the color spectrum. An easy example would be black and white. Obsidian is dark enough a blue that it contrasts well with snow. Likewise, the darker spruce wood contrasts well with white wool, snow, or things of that color. I've noticed that a wall of stone brick with a cobblestone pattern inside it looks wonderful. Mojang did a good job at finding a way to make cobble look alright.


Once you have a theme, a group of blocks you want to work with, it's time to start looking at the overall design. For the exterior, I'm able to sort of do it systematically.

Normally I build the front wall first, and generally it's either 8 or 13 blocks wide. There's something called the Golden Ratio, which is a number which people have seen for centuries as the best ratio of line lengths for beauty. In Minecraft, this can best be approximated using a series of numbers called the Fibonacci numbers. The first few are 1, 1, 2, 3, 5, 8, 13, and 21. Each number is the addition of the two behind it. So for my bog standard build, I'll make, say, an 8x13 house. A one-floor building will typically be 4 blocks high so it doesn't feel cramped indoors, but if you want to keep using the Fibonacci numbers, the height should be 5. Here is the outline of a 13x8x4 house. It will be used in further examples.


Something I learned is that blocks, depending on their texture, have something called movement, although I like to call it energy. Based upon their texture, they may seem to have vertical, horizontal, or neutral energy. Here's what I mean.

Blocks that have vertical energy include logs, melons, the sides of pumpkins, and chiseled smoothstone. Their textures seem to have a predominantly up-down direction to them. Logs in particular have this, which explains why they're so often favored as corner materials. Now even though I would argue that jungle and birch wood have more of a horizontal energy, we're so accustomed to using logs as edges that they would be acceptable.


Horizontal energy can be found in a lot of blocks. Double stone slabs are an example of horizontal energy and although many might disagree with me, I feel as though planks and wool also have horizontal energy. Smoothstone also has a bit of horizontal energy. Their textures are predominantly left-to-right in the default texture pack. Sideways logs are other examples.


Then there are blocks which don't exhibit much of any kind of motion or energy. You might consider dirt, sand, snow, lapis blocks, obsidian, emerald blocks, brick, and stone brick to be neutral. These are good for filling in walls or when you want to switch from one energy to another.


The way I typically design the exterior of a wall is this: I put blocks with horizontal energy along the top and bottom, blocks with vertical energy on the sides, then use neutral blocks in the corners where the two energies meet, and also as the main block that fills in the wall. This just looks right for me.


Note that the feelings of motion and what kind of blocks should be used where is, to an extent, subjective. I suppose many combinations that disregard these rules would look good.

Walls and floors can be improved by adding patterns. Something I might do for a living room is have the outline of the floor be whatever the bottom border block was, then fill the floor with some kind of checkered pattern, or something else. Likewise with the ceiling. Note that roofs are still a bit of a challenge for me. I may do a future revision of this guide, with some tips for roofs.


In order to escape the habit of making straight lines excessively, There are some things you could do. For instance, consider curving part or all of a wall so you have an alcove or some kind of semicircle. Experiment with it until you feel alright with it not being too pointy but not too flat. This is one of those things that is about personal preference. Most people won't be impressed by the exact arrangement as much as just seeing some curvature.


A fancy trick I encountered was instead of just building a pillar up for, say, an entrance, you might consider a diagonal side. Diagonals are sort of straight lines so if overused, they give blandness. Even better, you could take it into the third dimension, as advised below, and have the pillar point toward or away from the player. Here is something I made that's been sitting on my creative map.


Also useful are half slabs and stairs. When they first made it possible to place slabs and stairs upside down, I couldn't see the use in it. Now I'm glad they did, because it does a good job of breaking straight lines. They can be used to make arches, for instance. Alternatively they may act as extensions for support pillars. Half slabs serve as nice overhangs.


Next piece of advice: take it to the third dimension! This is where the decorative blocks, which I define as ones that aren't your standard size, come in to play. I'm talking glass panes, half slabs, stairs, saplings, ferns, flowers, fences, paintings, beds, and so on. Trapdoors are classic shutters. Fences may be used as support pillars. Panes make for excellent windows as they are thin and flexible in shape. I would recommend using them instead of standard glass blocks whenever possible. Buttons look good even if they're just sitting there. Look for safe ways to include fire, lava, and water, since they have moving textures. Adding these small things break up the otherwise blocky feel of a building. Redstone wire doesn't  have much appeal to me as anything except a functional block. Also remember to try including furniture on the inside, if it's appropriate.


If you want to make the house look realistic, check out buildings similar to it. Pretend the law of gravity can pull down all of the blocks unless they had a good support system. By doing this you'll probably end up adding support pillars, maybe even changing block choice for realism. The basement of a house tends to be concrete, not sponge; likewise, glass won't hold up the side of a building.

Windows are good to have. Small wooden huts feel a lot more open when there are windows.


I added these shutters after I finished the tutorial. They add to the third dimension aspect:


Lastly, consider implementing things that need to be made up of blocks. That's kind of vague, so here's an example: banners. Wool banners hanging from the ceiling, anchored to fences. Give that sort of RP, pretend feel a spin. For example, here's an antenna found on house roofs for getting channels broadcasted through the air.


The key to developing a style, outside of reading and observing others, is to experiment. Don't be afraid of asymmetry. Do a little pattern variation here and there.

The example house I made here may not come off as the most elegant one ever made. That's because I'm still learning how to do this. But I hope that what I've presented here is enough to help others like me get an idea how to make stuff that looks alright. No more cobblestone huts for us; now we are equipped with the basic skills to build an appreciable home.

Saturday, December 22, 2012

Some Work around The Cave

Single Player

Spent the past couple days back at the cave base, where I did two things of notice.

First, I moved my enchantment table. If you recall, the table was originally in the basement of the cave base, which was accessed by the stairs in the central room. This position was actually a bit inconvenient. In order to get to my zombie experience grinder I need to take the spiral stairs to the surface, then drop down at the collection point. Once I've built up 30 levels I would usually jump down the water drop and enchant in the basement. This was a bunch of excessive moving around, so I figured I would move the table.

This is how I first had it arranged:


That turned out to be too big, and the highest enchant level I could muster was 8. So I moved the books in a block.


Much better. The only annoying part is that the entrance to the room is right where the ladder to the place is, so it takes me a few tries to get in without being hoisted by the ladder. Still, it's much more convenient than having to run back to the cave and in fact, I can reach the table without really moving from the spot I normally stand to hit the zombies.

One of the zombies apparently had chainmail armor!


(I'm using the Mindcrack texture pack. The pinkish reddish mobs are regular zombies. Those slivers of blue? Those are zombie villagers. I could set up a sorter to generate villagers in the future.)

Finally, I reclaimed the bookshelves. I'll store those for later use.

The other thing I did was set up a simple carrot farm. For the first time in about three months I actually played Minecraft on my desktop. The laptop I've been using is woefully troubled by sounds. Whenever the game needs to load a new sound file, such as a Creeper hiss, the entire game will lock up for as long as a few seconds. This has on more than one occasion led to a Creeper exploding in my face. That's what happened today. So I took a copy of my map and put it on my desktop. The game experience was wayyy better. On to the carrot farm.

My first possible location for it was the stone brick road, next to my resupply room. I discovered there wasn't enough room there, as my wheat farm ever so slightly interferes. Instead I placed it in the tunnel that led to my former Nether portal. I cleared out some space and set things up:


Then I cleaned up the area and used a little bone meal to advance carrot growth.


Easy as pie. Though maybe not carrot pie.

The final change that needed to be made for the time being was a way to get up there. I opted to use wood slabs to make a simple staircase. Not the prettiest, but it works.


My preferred method of growing mushrooms, by letting them just sprout all over the place, is working nicely. I have an abundance of brown, but not much red, so those are mainly the ones I've been planting.


As I was working on the carrot farm, I started to question the future of this base. Granted, it's only been a little over six months since I first settled down in the cave, but things have changed since then. As a player, my ability to design things has improved dramatically. The game itself has gained a lot of new things which weren't around at the base's start - carrots, potatoes, beacons, and Withers to name a few. Most of it is in an incomplete state of some sort. There's frequently a mob, usually a Creeper, roaming the area because I haven't lit it up well enough. My laptop can't handle my piston elevator. I also wanted to make a base on the surface, back when my creative skills weren't worth much, but that's never happened.

So at worst I might get my stuff and head somewhere new. I'm not one to create new worlds. Since I currently play in version 1.4.5, this map has seen no less than 10 versions of Minecraft since I made it in 1.0.0. I've made a lot of progress on this world and have no desire to leave it. I like living in the caves, but with my newly found building skills I also want to take a stab at surface construction.

Two Year Anniversary

Tomorrow marks two years since I started this blog! I want to do something special to celebrate that and the New Year. Last year I did a tutorial of sorts on making an airship carrier. I like ships, so if I did something it would be something else related to ships, although perhaps a spacecraft this time around. This circle generator has been very useful, so I now have the ability to make things that aren't blocky.